

Placing a new banner on your blog is the fastest way to brand your blog. Why do this? Because you want (I think) to make your blog instantly recognizable for the "click-through" audience that you are reaching. The banner should identify you, and set up the visual character of your blog and your art.
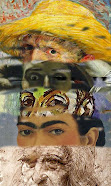
This post features my new e-mail banner, and at the top of The Colorist you will see my newest blog banner. I used Photoshop to create these, and I recommend that you get good with whatever design tool you have and learn how to work with layers. Once I cracked the code on layers, my design life improved dramatically, and I have fun making these things, whereas before it was like pulling teeth for me! The links at the bottom of this post shed light on using Photoshop: working with layers and making graphic products.
There are so many You Tube vids for this topic, that you ought to be able to find one that makes sense for you. My only advice is that you match the tutorial to your design software. Many videos show how to make a blog header with freeware, but find one for your tool. Also, if the tutorial shows how to upload the banner to Blogger, realize that the latest version of Blogger is dirt easy to use for headers. Just open Design, and use the widgets at the top of the template. You should do fine. I use the header widget, and then I add a banner photo below that.
The widgets for your header or banner offer three options:
Behind title and description
Instead of title and description
Have description placed after the image
For Pastel Workshop, my instruction blog, I chose the "Instead of..." option. I created it this way so that clicking on the banner brings the reader back to the home page. Here at The Colorist, I add the blog title and description above the header. This makes it clear that the reader is at my flagship blog, and clicking on the title and subtitle/description brings one back to home. The oversize header works as a logo for The Colorist, and lets the reader understand instantly what blog they have landed on.
Experiment with different settings for your header. Many bloggers choose a low profile header, which gets the content on the screen and above scroll. Have fun!
Simple Photoshop Header Tutorial - You Tube.
Your version of pse may vary from the video.
Note: I took an online workshop to learn how to make a business card with Photoshop. It was inexpensive and has served me in making all of my graphics. I think that instructor has moved on to other tutorials, but I recommend that type of thing for those of you who, like me, aren't completely computer savvy.


5 comments:
Thanks for the links Casey... very helpful. Love your banner.
well done.
I admire anyone to takes the time to pass on helpful information.
This one is a bonus and I thank you.
I follow your blog for your art. Fabulous stuff shows up on here.
Your banner does your art justice
Thanks, Jo! Thanks, BW!
You are very kind, Julie. I know this blogger thing has some bumps, and getting my very first banner was a hard thing. You had to find a tutorial, and then you had to write code. Then, half the time it didn't work! Blogger has come a long way, and banners are easy to place, now.
Glad the new one here is working.
Post a Comment